So, you want to learn how to start a blog…
You're here because you want to learn how to start a WordPress blog (obviously).
Maybe you have a passion or a hobby you want to share with the world.
Maybe you're a coach, service provider or creative entrepreneur that's getting started out and need a home on the internet.
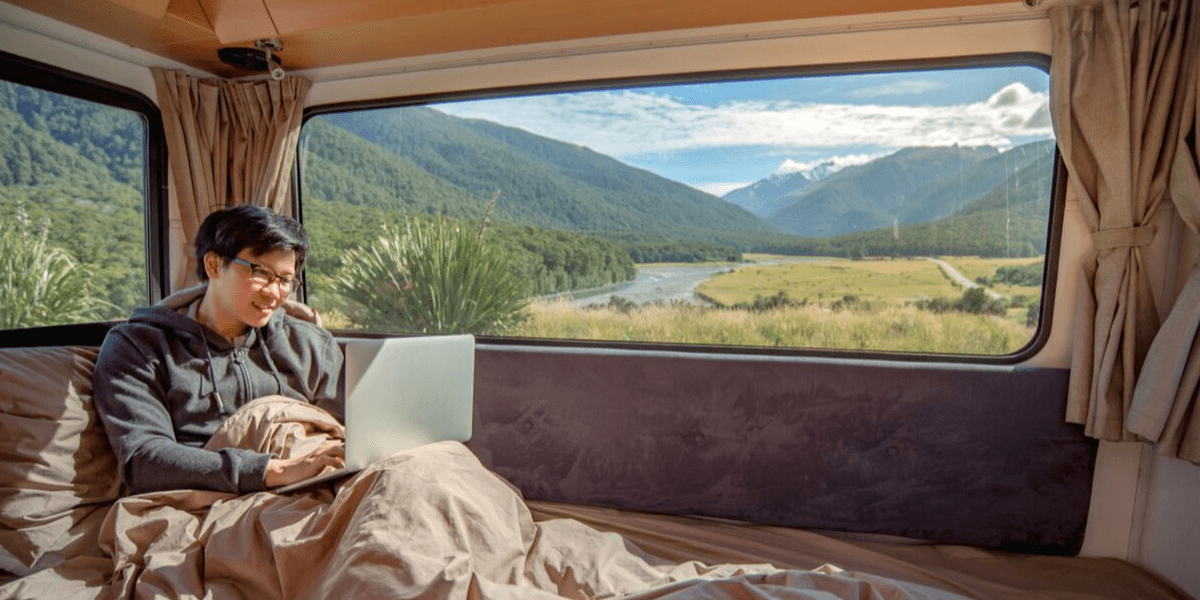
Maybe you're starting a travel blog to share everything you know with the world…
Or maybe you just want to start a blog to make money and work from anywhere in the world, even when it's just your couch.
This post will show you how to start a WordPress blog for whatever your motivation is – even if you want to learn how to start a blog just to bring in more money.
There is no shame in starting a blog just to make money – some bloggers make over a million dollars a year just from blogging. The numbers are real, and they don't lie! Building a blog is an essential stepping stone in building a sturdy foundation for a lasting business.
Blogging can completely change your life if you are dedicated and persistent. Just look at the countless reports all over the internet of people who have changed their own lives by starting a blog.
It's also a great way to make money, and it works if you put the work in. A lot of people think blogging is a guessing game and think “I sure hope this works”. I'm here to tell you that IT DOES WORK. It works for thousands of people. It works for me. But you have to put the work into it.
I say “building a blog” because that's exactly what it is. Don't feel overwhelmed by the amount of steps there are – you are building something. Rome wasn't built in a day. Brick by brick, your blog will come together.
I've modeled this guide exactly after my own experience and broken it down to make it so simple, even a beginner can do it.
This guide was put together to help those who want to learn how to build a blog the right way.
Before I was a blogger, I spent months learning, taking courses and scouring the internet for everything I could find about becoming a successful blogger.
Because (as you may have noticed) when I do something, I tend to go all out. Sometimes ridiculously so, and blogging was no exception.
Now, let's get started, shall we? You got this!
How to Start a Blog in 4 Simple Steps:
- Choose a Domain Name – this is important! Your domain name should be something you love that is relevant to what you plan on blogging about. If you’re still unsure of your niche, you can always just use your own name as your domain name. That way, you’re free to do any niche you want without being tied to one in particular.
- Get Self-Hosted – also important. Purchasing self-hosting means you are free to do whatever you want with your website, including monetizing it. With a free website, you aren’t. Readers of my blog will get 60% off the hosting that I use and love – you can get started for less than the price of 1 coffee a month!
- Install WordPress.org – Once you have hosting, this step is a breeze! In fact, the lovely people over at Siteground will actually do it for you – something I didn’t expect and was really happy with when I signed up!
- Choose and Customize a Theme – the final step in getting your new home on the web ready for blogging!
The difference between wordpress.com and wordpress.org
Before we get started it's important to talk about WordPress.com and WordPress.org. This post teaches you how to build a blog “the right way”, and by that I mean the way that will make it to where you can use it to make money. WordPress.com is FREE and you cannot monetize it, WordPress.org is something you purchase and OWN – and you can do whatever you want with it (like making that money!)
WordPress.com – These websites are free, but they limit your income potential. You cannot customize, add plugins or monetize these blogs.
WordPress.org – Self-Hosted, basically meaning your website is hosted on a server in the cloud that you pay for. It’s where your website lives! That’s why it’s not free, you own it! This isn’t as techy as it sounds, it just means you own your website and can do whatever you want with it.
Think of it as the house your website lives in, and you are paying rent. Your landlord is super cool and allows you to do whatever you want – painting, tearing down walls, putting up billboards, you name it!
This is what serious bloggers use who want total customization and the ability to heavily monetize their websites.
In this tutorial you will learn how to start a blog with WordPress dot org – because I believe it is unparalleled with any service out there for blogging for profit.

Download this FREE ebook learn 60+ ways to earn an income from anywhere!
1. Choosing a domain name
This should actually be step #2 because you will buy your domain after you choose a hosting package, but it is best to start brainstorming as early as possible.
You get a free domain name when you sign up with Siteground – just another reason to love them! You can check and see if the domain name that you want is available by typing it in here at Siteground. (just click “get started” on any of the plans and the next page you will be taken to will say “register a new domain” – here you can type it in and see if it’s available)
As I stated earlier, this is an incredibly important step. If you have already chosen a niche, make your domain name related to that. You can change your domain name later, but it is kind of a pain so it’s best to just choose one that you love the first time around.
Don't spend too much time agonizing over your domain name. If you are stuck or can't decide, just use your name. Using your name is really versatile because you don't have to stick to a particular niche and you can try a few different things to see what you like.
2. Getting self-hosted
I personally use Siteground, and I am so happy with them. They have been great to work with and have answered any of my questions really quickly every time, I am so happy I did my research and found them. Set-up was a breeze, too!
Previously I used Bluehost for an old blog I had and it was just okay, but based on my research their service has really gone downhill over the past couple of years. Siteground has exceeded my expectations! (plus I just really like their logo – green is my favorite color!)
Anyone signing up with Siteground through my link can get hosting for less than $4 a month… that’s over 60% off. And that’s seriously all it takes to start your very first blog… $3.95 a month.
Click here to go to Siteground and choose your Hosting Plan.
Choose Your Hosting Plan
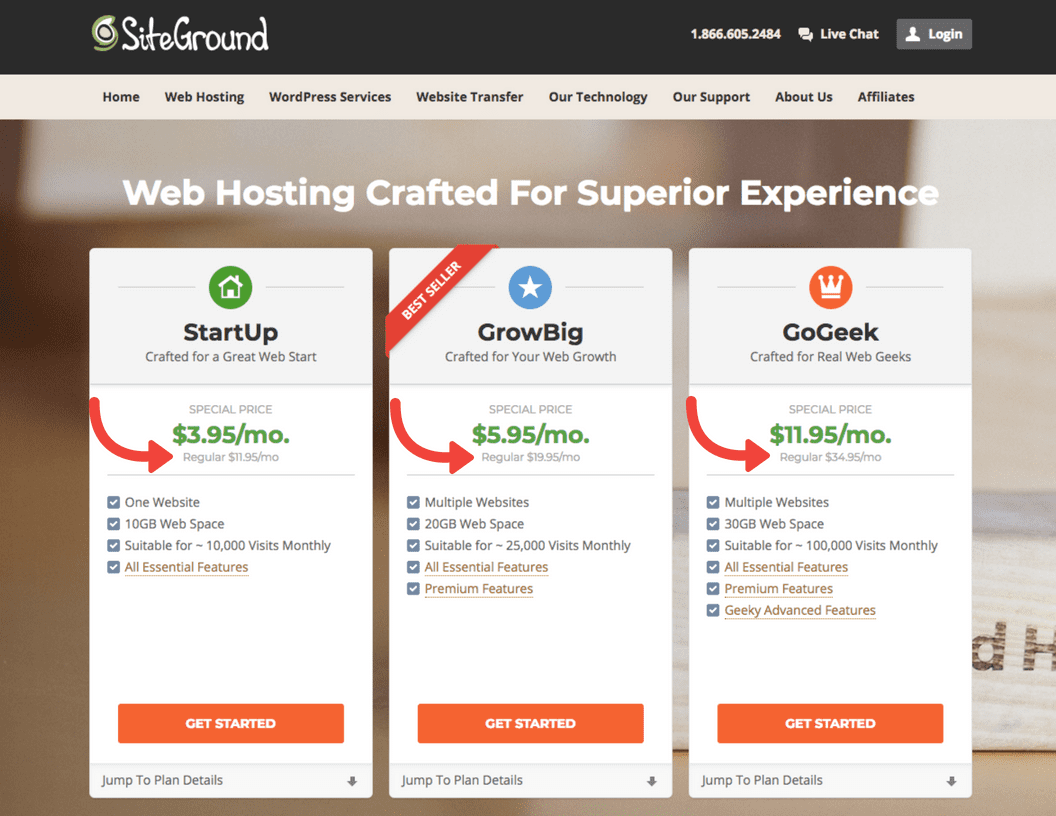
There are 3 different hosting plans you can choose from:
StartUp Plan – Great for beginners who only want to make 1 website. This plan can host up to 10,000 website visitors and is the lowest priced. Regular price is $11.95/mo but you can get it for over 60% off through my blog ($3.95/mo)
GrowBig Plan – This plan is good if you want to start more than 1 website and can handle up to 25,000 visitors a month. Normal Price $19.95/mo, use my link for just $5.95/mo
GoGeek Plan – This plan is best suited for established blogs driving a lot of traffic, as it can handle up to 100,000 visits a month. This is the plan I chose when I signed up with Siteground… Because I go hard
I wanted to create more than 1 blog and my goal is to have over 100,000 visits within a year. I am ridiculously ambitious 🙂 Regular Price: $29.95/mo – or $11.95/mo through this post.
You can always start with the smaller plan and upgrade if your blog goes viral and needs more space to handle traffic.
60%+ Off Siteground Offer through Making Money and Traveling
Register Your Free Domain Name
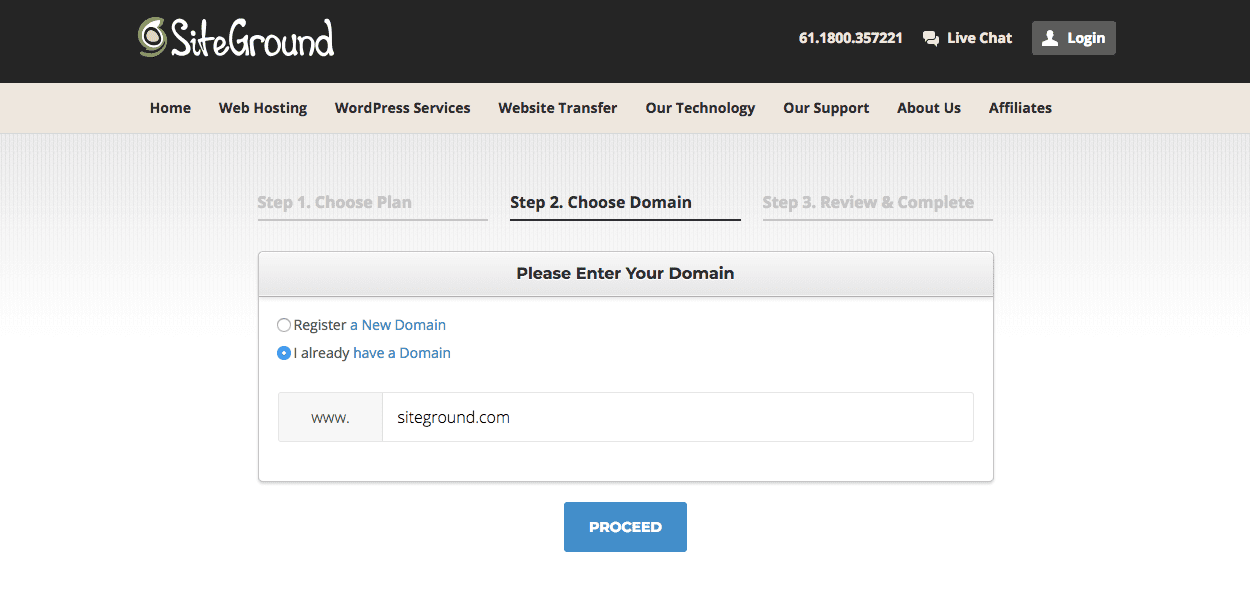
This is the step where you register the domain name you chose earlier on. Super simple, just type it in and hit proceed.
If you have already bought a domain somewhere else, you can use that instead, no problemo! Just type it in and hit Proceed, and after your hosting is purchased support will help walk you through transferring your existing domain.
Review and Complete
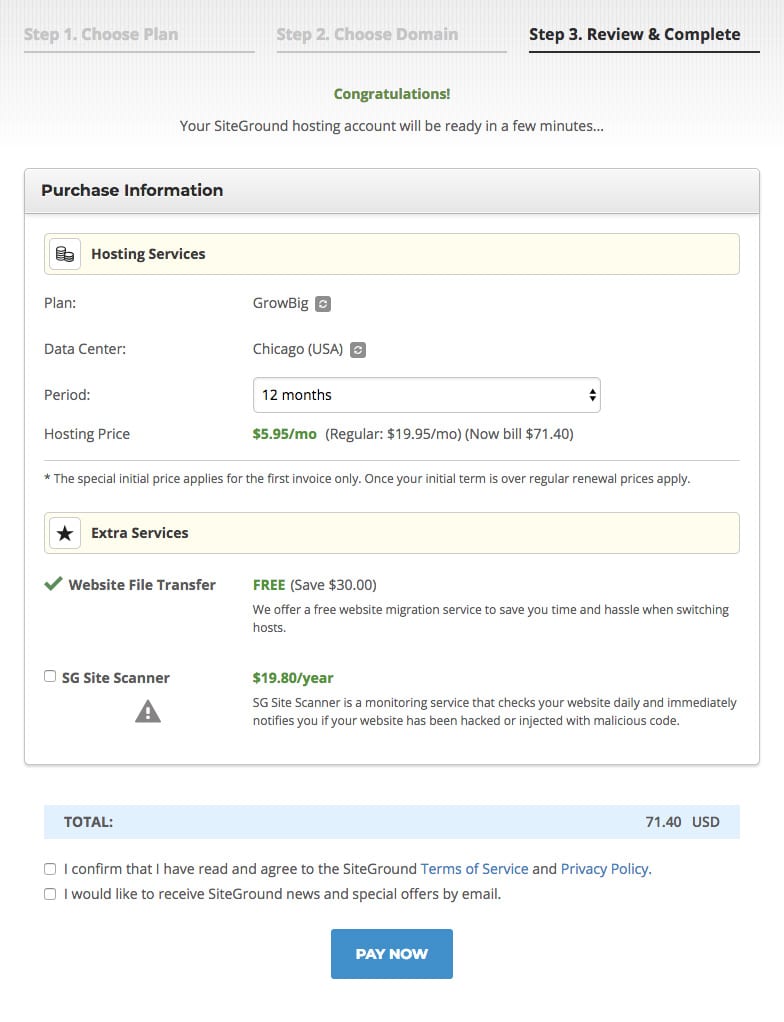
With Siteground, you can choose to pay for a month, a year, 2 years or 3 years. The discount will only apply for your first term of service, so I highly recommend purchasing a year or more if you want the best discount!
I signed up for the GoGeek Plan with a discount and I purchased a year, although I wish I would have signed up for 3 and gotten the most bang for my buck.
The last 2 options are of course, optional. I do recommend getting domain privacy, however. What this does is make it to where when someone looks up your website information, they won’t be able to see your name, email and phone number.
I personally also chose the SG Site Scanner Option, but it’s not necessary. I get a weekly email letting me know that my website is clean, it’s nice to have that service watching my back! As you may have noticed, I really just went all-in here. Again, ridiculously ambitious.
3: Installing wordpress.org on your new website
The last step in this process and the easiest is getting the WordPress.org app installed on your brand-spankin-new website.
If Siteground didn't automatically install it for you(they usually do), It’s as simple as just pushing a button!
Once you're signed in to your Siteground Dashboard, mouse over to where it says “My Accounts”. 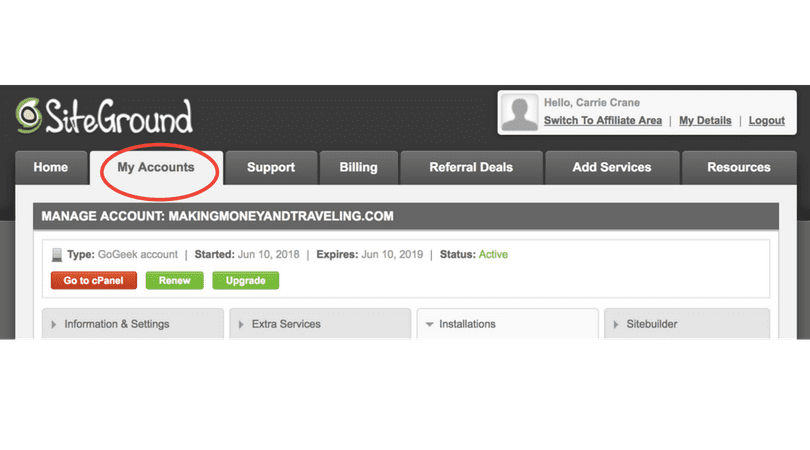 After you're in the “My Accounts” Tab, Click on “Go to cPanel”.
 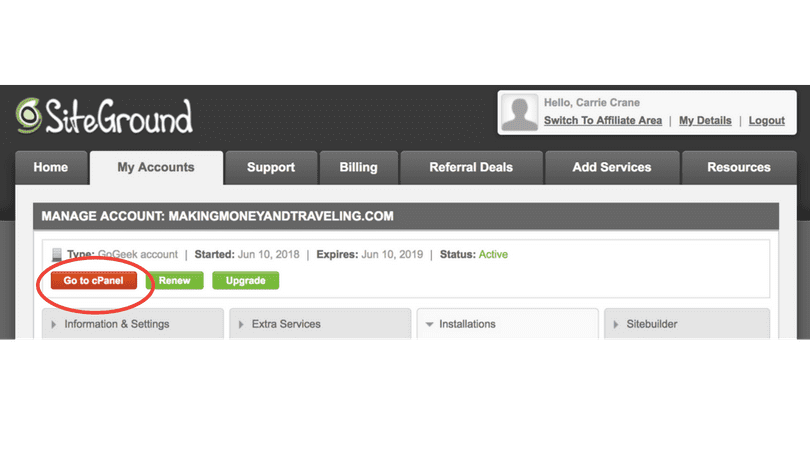 Once you're in the cPanel, Scroll down to “WordPress Tools”
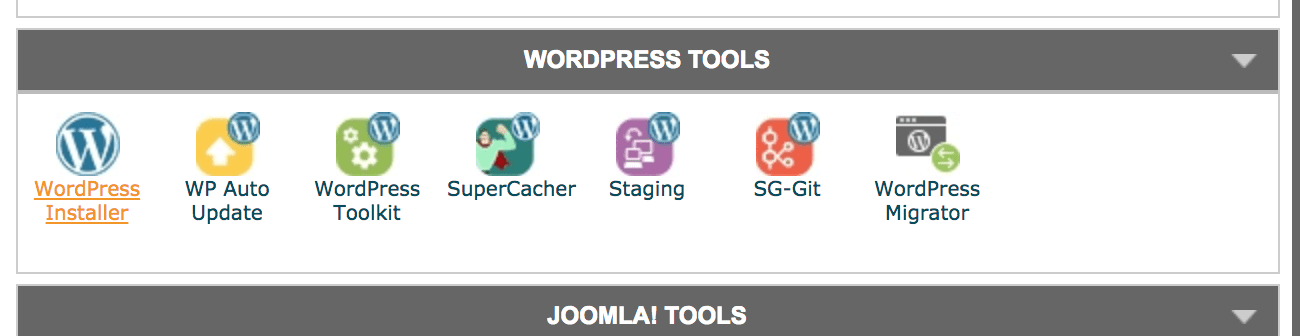
Once you've clicked on WordPress Tools, click install and follow the prompts to get WordPress installed on your new website.
Choose your Protocol, leave “In Directory” Blank, name your blog and make sure to write down your Username and Password because you'll use this every time you log in.
Once the installation is complete, you'll see a success page with your admin URL, and you should also get an email. In the future, you will be able to access your website dashboard by going to “www. yourblog .com/wp-admin” OR “www. yourblog .com/admin”
Once WordPress has been installed on your new website, it’s time to log in, pick a theme and start blogging!
4: Pick and customize a theme
Once you are all set up and logged in to your brand new WordPress website, you may want to choose a new theme for it. It will come with a theme pre-installed that is nice and minimal looking, but you have endless free choices to pick from if you want.
Don’t let yourself get overwhelmed with choosing a theme – just choose the one you like for now and start from there.
There are thousands of free themes on WordPress that are customizable enough to make things look the way you want them, and there are thousands of tutorials on YouTube that will show you how to customize each one.
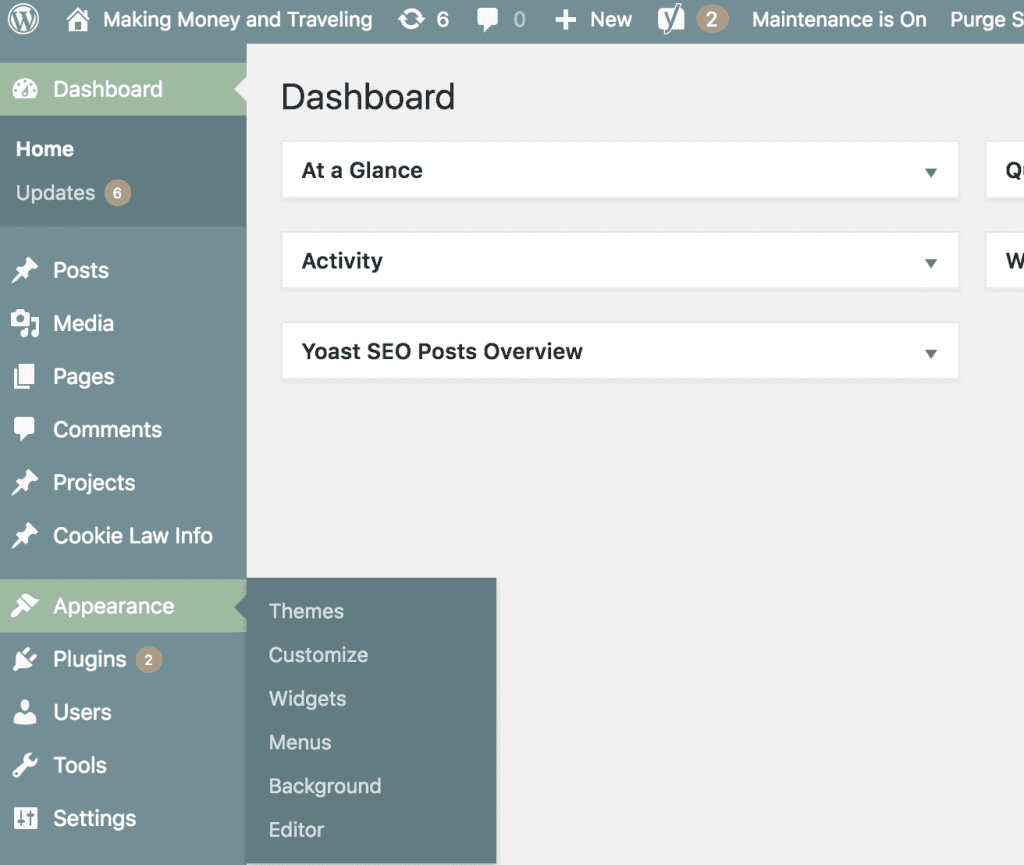
In your WordPress Dashboard, hover your mouse over the word “Appearance” on the sidebar, and select “Themes”.

Next, click “Add New”. This button is at the top of the themes page next to the title.
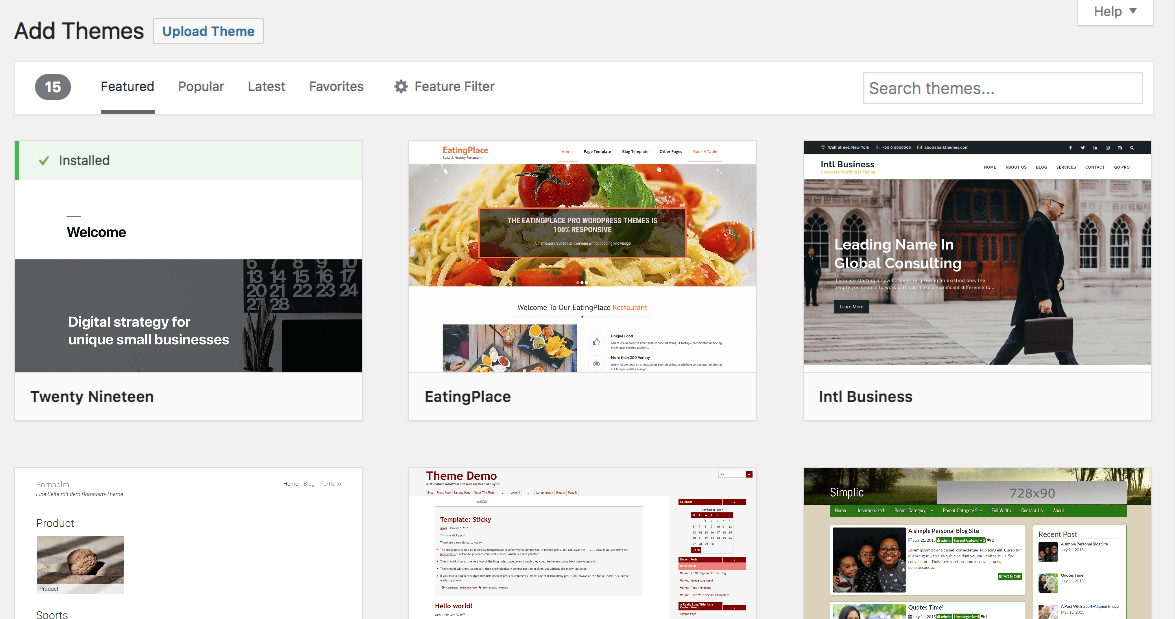
Now get to browsing. Use the search bar if you want and search for terms like “blog” “minimal” “feminine” “travel” etc. Preview themes to your heart's content!
When you find a theme you like, click install, then activate and then you'll be able to customize it.
Once you install a theme and realize it looks NOTHING like the preview, don’t panic. It’s not just you, you have to do a bit of tweaking to get it looking right.
My best advice for getting a theme just the way you like it is simply this: Once you find a theme you like, go to YouTube and search “ThemeName Customization Tutorial”.
For most themes, you’ll find that someone in the world has made a tutorial showing you how to set it up – the internet is awesome like that 🙂
If you want to invest in a premium theme, go for it – It’s totally not necessary but it does allow you more customization options.
I am a perfectionist and I wanted to be able to customize every single thing on my blog, so I finally went with one of the most customizable and beginner-friendly themes that exists for WordPress: Divi by ElegantThemes.
I currently use Divi and I am really happy with it. Everything you can imagine is customizable and it makes really great looking websites, if I do say so myself 🙂
I plan on making a Divi tutorial in the future, but if you want total customization of your website, it’s a great choice.
YOU DID IT!
You just started your very own WordPress blog… Congratulations!
Now you know how simple and affordable it is to start a blog that you can profit from – it may seem complicated at first, but learning how to start a blog is really very simple, especially when you have a post like this to walk you through it.
By now, you realize that you do have to invest a little bit of money to get started with a WordPress.org blog, but don’t let that deter you. If you plan on blogging long term and consistently, your blog will pay for itself many times over as your progress throughout the journey.
It’s more of an investment than an expense. Starting your blog can be the first step into an amazing journey of making income from anywhere you have wifi! This is a great accomplishment, you can pat yourself on the back now.
Did this tutorial help you? Do you have any comments or questions about learning how to start a blog? Leave them below!

Carrie Wilder
Carrie has a passion for location independence and nomadic lifestyles. After traveling full-time in an RV and living the van life, she created Making Money and Traveling to help others make the switch to a remote lifestyle. Learn more about Carrie on the About page or connect on social media below.
Download this FREE ebook learn 60+ ways to earn an income from anywhere!